
Technical Note 01
How to Install the HT Typeface Collection
The fonts in the HT Typeface Collection are provided in two different formats: Adobe Postscript Type 1 fonts and TrueType fonts. Normally, only one format should be installed. Both produce good results and work with a wide variety of programs. If you use a lot of Adobe programs like Illustrator, InDesign, Acrobat, Photoshop, etc., then you may want to use the Adobe Postscript Type 1 format. But the TrueType format will also work with these programs. The choice is yours.
Note: If you notice trouble with the fonts with some programs, you can remove the format that you installed and install the alternate format. It may solve the problem. Since Windows manages the fonts, either format should work but some programs may do better with TrueType and others may do better with Adobe Postscript Type 1.
Installation Instructions for Windows XP
You should be logged into Windows XP with an "Administrator"-level User Account to use this procedure.
- Insert the HT Typeface Collection CD into the DVD/CD drive of your computer.
- Open the Windows Control Panel and launch the "Fonts" applet. The "Fonts" window should open containing a list of the fonts already installed on your computer.
- Select the "Install New Font..." command from the "File" menu. The "Add Fonts" dialog should open.
- Use the "Drives" list in the lower center portion of the dialog to select the DVD/CD drive where you inserted the HT Typeface Collection CD. Then select the "htfont" folder in the "Folders" list in the lower left corner of the dialog. After you do, the "List of Fonts" at the top of the dialog should be populated with the fonts in the HT Typeface Collection as shown below:
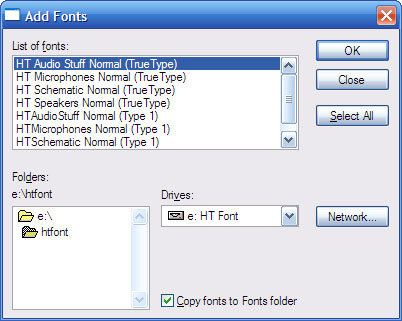
There are four fonts (HT Audio Stuff, HT Microphones, HT Schematic and HT Speakers) and they will be listed twice. The TrueType versions will be listed first with "(TrueType)" at the end of each font name. The Adobe Postscript Type 1 versions will be listed second with "(Type 1)" at the end of each font name.
- Use your mouse and either the Shift or Ctrl key of your keyboard to select all four of the fonts from one group (TrueType or Type 1). Make sure that "Copy fonts to Fonts folder" is checked at the bottom of the dialog and click on the "OK" button to install the fonts.
Installation Instructions for Windows 7 and later
You should be logged into Windows 11, 10, 8.x or 7 with an "Administrator"-level User Account to use this procedure. You will be asked to confirm the operation in Step 6.
- Insert the HT Typeface Collection CD into the DVD/CD drive of your computer.
- Open the Windows Control Panel and double-click on the the "Fonts" folder. The "Fonts" folder should open containing a list of the fonts already installed on your computer.
- Right-click on an empty area of the Fonts folder and select the "Install New Font..." command from the pop-up menu. The "Add Fonts" dialog should open.
- Use the "Drives" list in the lower center portion of the dialog to select the DVD/CD drive where you inserted the HT Typeface Collection CD. Then select the "htfont" folder in the "Folders" list in the lower left corner of the dialog. After you do, the "List of Fonts" at the top of the dialog should be populated with the fonts in the HT Typeface Collection as shown below:
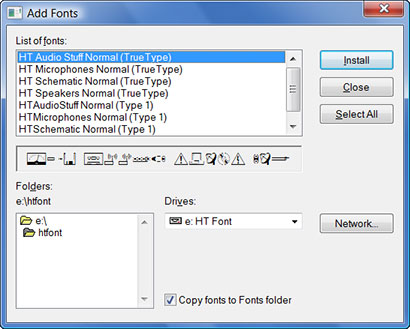
There are four fonts (HT Audio Stuff, HT Microphones, HT Schematic and HT Speakers) and they will be listed twice. The TrueType versions will be listed first with "(TrueType)" at the end of each font name. The Adobe Postscript Type 1 versions will be listed second with "(Type 1)" at the end of each font name.
- Use your mouse and either the Shift or Ctrl key of your keyboard to select all four of the fonts from one group (TrueType or Type 1). Make sure that "Copy fonts to Fonts folder" is checked at the bottom of the dialog and click on the "Install" button to install the fonts.
- A "User Account Control" dialog will appear to ask your permission to continue. This is a feature of Windows 7 and Vista to prevent unauthorized activity on your computer. Click on the "Continue" button and the fonts will be installed
Please see Technical Note 02 if you need to remove the fonts.